BEECN Caches: Difference between revisions
| (7 intermediate revisions by 2 users not shown) | |||
| Line 127: | Line 127: | ||
'''Tools and materials needed:''' | '''Tools and materials needed:''' | ||
* | * 2 x 6" or 8" adjustable wrenches; | ||
* Socket set with 3/4" socket; | |||
* Car jack and jack arm (this is helpful since otherwise you would need to empty the cache and flip it over); | * Car jack and jack arm (this is helpful since otherwise you would need to empty the cache and flip it over); | ||
* A bike tire patch kit and/or a replacement tube; | * A bike tire patch kit and/or a replacement tube; | ||
* Exam gloves (this is a messy job). | * Exam gloves (this is a messy job). | ||
Use the two | Use the two wrenches to take the wheel off entirely (best practice is to loosen the nuts while the cache is still on the ground to prevent the wheels from pivoting while you monkey with them). and pull out the tube. Run your fingers inside the tire after the tube is out to make sure there's nothing poking through to puncture the tube you put in. If you buy patching material at a bike shop the easiest to use are the self-adhering patches that come with a bit of sand paper to scrape the area around the hole. | ||
If the tube is replaced, do not throw away the old tube. PBEM will pick it up from you and use it to order a new one from Les Schwab. | If the tube is replaced, do not throw away the old tube. PBEM will pick it up from you and use it to order a new one from Les Schwab. | ||
| Line 180: | Line 181: | ||
File:BEECN Radio.batteries.jpg|''Figure 9: Load AA batteries into the battery pack.'' | File:BEECN Radio.batteries.jpg|''Figure 9: Load AA batteries into the battery pack.'' | ||
File:BEECN Radio.volume control.jpg|''Figure 10: Radio volume control.'' | File:BEECN Radio.volume control.jpg|''Figure 10: Radio volume control.'' | ||
File:ICom Serial Number.png|''Figure 11: Location of the serial number.'' | |||
</gallery> | </gallery> | ||
| Line 289: | Line 291: | ||
To use the antenna, unscrew the "rubber ducky" antenna from the handheld radio. In its place, screw on the coupling at the end of the cable connected to the radio. The setup works best with two people: one to operate the radio, and another to point the antenna skyward. With the antenna connected and working, the signal coming in from the Relay should sound stronger and clearer. | To use the antenna, unscrew the "rubber ducky" antenna from the handheld radio. In its place, screw on the coupling at the end of the cable connected to the radio. The setup works best with two people: one to operate the radio, and another to point the antenna skyward. With the antenna connected and working, the signal coming in from the Relay should sound stronger and clearer. | ||
The cable that connects the antenna to the radio is a [https://a.co/d/aL9mev7 10-feet RG142 BNC Male to N Male RF coaxial cable]. It is not a good idea to go longer than 10 feet in length because, as the radio is UHF, the operator may experience signal loss. The larger "N" connector connects to the CXL antenna. The other end with the smaller BNC connector cannot be connected directly to the handheld radio as the radio uses a proprietary "J" connector. To complete the connection use a [https://www.gigaparts.com/icom-ad-98fsc.html?utm_term=sku-zic-ad98fsc&P_Max_Other_Products&gad_source=1&gclid=Cj0KCQjw-e6-BhDmARIsAOxxlxVxLIqMSGSM03q7lW8czoipOCzcKGmvoglnz9WhKeyyzmuuGgJYfwQaAiNdEALw_wcB J Male to BNC Female Adapter], which allows the BNC end of the cable to connect to the Icom handheld radio with a J connector. | |||
{| class="wikitable" margin:0px 20px 0px 0px;" | {| class="wikitable" margin:0px 20px 0px 0px;" | ||
|+ | |+ | ||
! colspan="2" style="background-color: #ecbf33;|CXL Antenna Information | ! colspan="2" style="background-color: #ecbf33;" |CXL Antenna Information | ||
|- | |- | ||
! style="text-align:left;" | Manufacturer | ! style="text-align:left;" | Manufacturer | ||
| Line 533: | Line 537: | ||
* Four removable webbing handles | * Four removable webbing handles | ||
|} | |} | ||
==== Use of MegaMovers ==== | |||
{{#ev:youtube|qZmlS47ZkYY|430|right|'''''Video: How to use a MegaMover'''''|frame}} | |||
MegaMovers are intuitive enough not to require a handbook. But a few notes are in order: | |||
* MegaMovers '''''can be used''''' for dragging patients when necessary. However, a MegaMover used for dragging should not be used again for patient transport. | |||
* Most (not all) MegaMovers stocked in BEECNs have a cross strap to help secure the patient. Use of a cross strap is particularly important for dragging. | |||
* Don't forget how many people it takes to transport a patient safely. Best practice is four ''minimum''. A MegaMover will allow for up to ten people helping. | |||
* A MegaMover is about 2 lbs. by itself, and folds down to 10" x 12" x 1". A deployed MegaMover is 32” x 72” and has a load limit of 500 lbs. | |||
[[File:MegaMover 2.jpg|300x300px]] | |||
== BEECN First Aid Kits == | == BEECN First Aid Kits == | ||
Latest revision as of 15:48, 15 May 2026
| BEECN Guidelines |
| Introduction |
| BEECN Program Organization |
| BEECN Sites |
| BEECN Volunteers |
| BEECN Caches |
| Operations at BEECN Sites |
| Operations at Fire Stations |
| Back to Main Guidelines ↱ |
This section covers the BEECN equipment cache specifications, information about the equipment found in the cache and how to use it.
Equipment Caches - General
PBEM is ultimately responsible for, and has complete discretion over, the design, purchase, placement, content, and security of BEECN caches.
Equipment Caches - Placement
- The location of a BEECN cache is NOT public information. It is information that should be known only to, and kept confidential by: PBEM, a hosting property owner, and volunteers responsible for the cache. All persons who know the location of a cache or have possession of a BEECN profile should treat the information as confidential.
- Optimally, a BEECN cache is secured in an indoor location that volunteers have access to in the event of a deployment. An indoor location’s structure should be reasonably expected to endure a major earthquake sufficiently that volunteers can recover the cache safely.
- The property on which a BEECN cache is stowed may be a school, a business, a place of worship, or a private residence. In any situation for deployments and exercises, volunteers should act as guests and take care not to damage the premises or (during drills and exercises) interrupt other activities on the site. Volunteers will defer to the authority of a property owner, or the owner’s representative.
- When a BEECN cache is located on private property, PBEM will enter into a Memorandum of Understanding (MOU) with the property owner. While MOUs are negotiated between PBEM and the property owner, a sample MOU can be downloaded HERE for review.
Supplementary Equipment in BEECN Caches
- If there is space available, members of a BEECN cohort or nearby NET may place their own equipment in the cache to supplement the PBEM provided equipment.
- PBEM is not responsible for the loss, theft, recovery, or replacement of supplementary equipment placed in a BEECN cache.
- Supplementary equipment must not include food, prescription medications, or drugs.
BEECN Cache Inventory
A complete BEECN cache consists of the items found in the following list. BEECN volunteers can log an inventory of their cache through the BEECN Journaling System.
|
|
BEECN Cache Boxes
There are two types of BEECN cache boxes that volunteers may encounter in the field.
BEECN Mark I
| Mark I Cache Box Specifications | |
|---|---|
| Length (including handles) | 81" |
| Length (box alone) | 61" |
| Width | 25" |
| Height | 34" |
| Weight (fully loaded) | ≈ 250 lbs |
| Volume | ≈ 30 ft³ |
The most common is the "BEECN Mark I" diamond-plated aluminum toolbox (specifically, a UWS #TBC-60; spec sheet). It is bolted to a steel cart with wheels. All wheels are affixed with a castor to enable better maneuverability. These boxes were manufactured by Madden Fabrication and are being slowly phased out, replaced with Mark II caches as PBEM resources permit.
- Click an image to enlarge
-
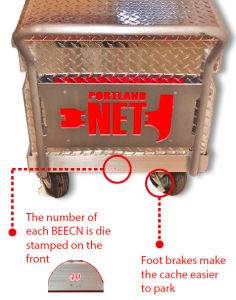 Figure 2: Appearance of a Mark I cache from the front.
 -
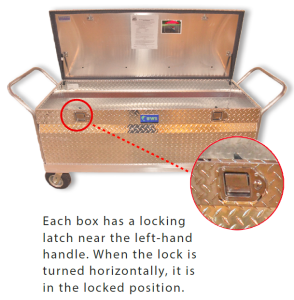 Figure 3: BEECN cache locking mechanism.


Most frequently, a BEECN Mark I is secured by means of a key safe and heavy gauge steel chain.
- Click an image to enlarge
-
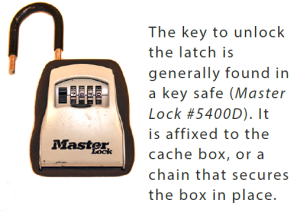 Figure 4: Key safe most often used to secure a BEECN.
 -
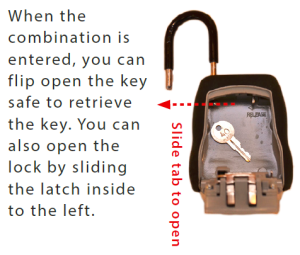 Figure 5: Key safe mechanics.


Troubleshooting the Mark I cache lid
Because the Mark I boxes have endured years in the elements and rough use, it is not uncommon for them to have problems with the lid latching mechanism (i.e. the lid won't lock shut). BEECN volunteers are encouraged to troubleshoot the problem themselves, but to contact PBEM if they cannot fix the problem. A volunteer may need pliers, a six inch (or larger) adjustable crescent wrench, and a mallet or hammer.
Most of the time the remedy involves adjusting one or both of the bolts on the lid. Each bolt is held on by two hexagonal nuts. A six inch (or larger) adjustable wrench works well to loosen these nuts and move the bolt to the left or right, whichever is needed in order for the bolt to snap into place when it connects with the locking mechanism on the main portion of the box. Some trial and error may be needed to get it right.
Graphite, Lock-Ease or similar products made for lock mechanisms are the only products that should be used on the lock. Do not use WD-40 or other general purpose "lubricants". Many of these contain solvents that, over time, will make the lock more difficult to operate.
You know you've got it working when you snap the lid shut and then turn the box key from the vertical to the horizontal position (don't force it) and the two latch handles do not move when you try to open the lid.
Mark I cache tires and moving the cache
The Mark I was designed to be mobile, with the idea that volunteers would wheel it from its storage location to the BEECN site. In practice, this is can be challenging. The inflatable tires can traverse uneven ground to a point, but do not do well in mud. Because of this, and since a fully loaded cache is over 250 lbs., it takes two people to move one of these caches provided the tires are fully inflated. Otherwise, in an actual deployment, volunteers may need to open the cache and carry supplies to the BEECN site.
For underinflated tires, each Mark I cache should include a bike tire inflation pump. If inflating the tire that way does not work, there is a good chance the tube needs replacing or patching. PBEM staff can replace the tube, or provide the needed tools to a BEECN volunteer to do it themselves.
Tools and materials needed:
- 2 x 6" or 8" adjustable wrenches;
- Socket set with 3/4" socket;
- Car jack and jack arm (this is helpful since otherwise you would need to empty the cache and flip it over);
- A bike tire patch kit and/or a replacement tube;
- Exam gloves (this is a messy job).
Use the two wrenches to take the wheel off entirely (best practice is to loosen the nuts while the cache is still on the ground to prevent the wheels from pivoting while you monkey with them). and pull out the tube. Run your fingers inside the tire after the tube is out to make sure there's nothing poking through to puncture the tube you put in. If you buy patching material at a bike shop the easiest to use are the self-adhering patches that come with a bit of sand paper to scrape the area around the hole.
If the tube is replaced, do not throw away the old tube. PBEM will pick it up from you and use it to order a new one from Les Schwab.
BEECN Mark II
Designed by Ernie Jones and Greg Madden, the Mark II is the newest model of BEECN cache, and PBEM purchases and installs them as resources permit. The locations and appearance of these caches are shared only with volunteers assigned to them. The Mark IIs are also manufactured by Madden Fabrication.
UHF Handheld BEECN Radio
Each cache includes an Icom f4001 series UHF transceiver. The operations section of these Guidelines will cover which BEECNs use which channels. This section will cover basic operation of the radio. The best guide to using the radio is the instructional video on the right side of this page.
| UHF Handheld BEECN Radio Specifications |
|---|
| Powered on six AA batteries |
| Operates on 400 - 470 MHz UHF frequencies |
| Four watts transmit power |
| Instruction Manual | Spec Sheet |
 |
|
Preparing the radio
| IMPORTANT! After using the radio, remove batteries and disassemble. |
The radio should either be in a carboard box marked "Icom" or a blue Pelican case (if the radio is still in a cardboard box, please let PBEM know so they can replace it with a Pelican case). When you open the box, you will find the radio disassembled in three pieces: radio, battery pack, and antenna Figure 8). You will also find AA batteries in the box with the radio. Load batteries into the battery pack and affix the pack to the back of the radio (Figure 9). Screw the antenna on. Power the radio on to test the batteries.
- Click an image to enlarge.
-
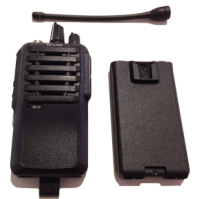 Figure 8: A BEECN radio disassembled into its three main parts: radio, battery pack, and antenna.
 -
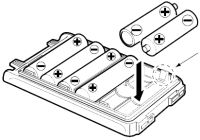 Figure 9: Load AA batteries into the battery pack.
 -
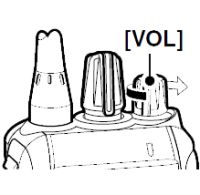 Figure 10: Radio volume control.
 -
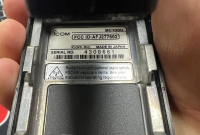 Figure 11: Location of the serial number.


Turning power ON and channel selection
Rotate [VOL] to turn power ON (Figure 10). Rotate [ROTARY SELECTOR] to desired operating channel.
Receiving
- Rotate [VOL] to turn power ON.
- Rotate [ROTARY SELECTOR] to operating channel.
- When receiving a call, adjust audio output to a comfortable listening level.
Transmitting
- Wait for the channel to clear to avoid interference.
- Hold the radio two to four inches from your mouth.
- Push and hold [PTT] and wait two seconds, then slowly speak into the microphone at a normal voice level.
| IMPORTANT! After using the radio, remove batteries and disassemble. |
LED indicator
The radios are programmed to flash LED warning codes for different error conditions, such as a low battery. Use the guide below to interpret those codes if you see them. The only one that will immediately stop you from communicating is the "channel error" code. That means you have selected a channel not programmed to the radio and you probably selected the wrong channel. If you are on the correct channel but you still get that error, the radio needs to be flashed; contact PBEM.
| TX: Steady red light while transmitting signal | |||||||||||||||
|---|---|---|---|---|---|---|---|---|---|---|---|---|---|---|---|
| R | |||||||||||||||
| RX: Steady green light while receiving a signal | |||||||||||||||
| G | |||||||||||||||
| Fast/Slow scan: Blinks when the Fast/Slow scan is activated | |||||||||||||||
| G | G | ||||||||||||||
| Low battery 1: batteries should be changed (blinks slowly) | |||||||||||||||
| G | G | ||||||||||||||
| Low battery 2: batteries must be changed (blinks fast) | |||||||||||||||
| G | G | G | G | ||||||||||||
| TX low battery 1: Low battery detected during TX mode | |||||||||||||||
| R | R | ||||||||||||||
| TX low battery 2: Very low battery detected during TX mode | |||||||||||||||
| R | R | R | R | ||||||||||||
| Channel error: A non-programmed channel is selected | |||||||||||||||
| R | O | R | O | R | O | R | O | R | O | R | O | R | O | R | O |
UHF radio case
-
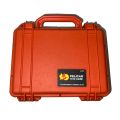 Each handheld UHF BEECN radio should be stored in a small Pelican 1150 case.
 -
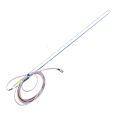 CXL antenna included in the cache of some (but not all) BEECNs.


In order to keep it safe, weatherproof, and organized, each BEECN radio should be kept in an orange Pelican 1150 case. If a BEECN volunteer finds that their radio is still in a cardboard box, they should contact PBEM and ask for the Pelican case.
Accessory antenna
A very limited number of BEECNs whose Primary Relays are difficult to reach have included in their cache an accessory antenna that plugs directly into the handheld radio. The antenna is a CXL 70-3; a 3 dBd gain base station UHF Antenna.
To use the antenna, unscrew the "rubber ducky" antenna from the handheld radio. In its place, screw on the coupling at the end of the cable connected to the radio. The setup works best with two people: one to operate the radio, and another to point the antenna skyward. With the antenna connected and working, the signal coming in from the Relay should sound stronger and clearer.
The cable that connects the antenna to the radio is a 10-feet RG142 BNC Male to N Male RF coaxial cable. It is not a good idea to go longer than 10 feet in length because, as the radio is UHF, the operator may experience signal loss. The larger "N" connector connects to the CXL antenna. The other end with the smaller BNC connector cannot be connected directly to the handheld radio as the radio uses a proprietary "J" connector. To complete the connection use a J Male to BNC Female Adapter, which allows the BNC end of the cable to connect to the Icom handheld radio with a J connector.
| CXL Antenna Information | |
|---|---|
| Manufacturer | Amphenol Procom |
| Technical specs | Spec Sheet |
BEECN Pop-Up Shelters
| BEECN Pop-Up Shelter Specifications | |
|---|---|
| Make/model | E-Z Up
Pyramid Shelter |
| Length (in the bag) | 50" |
| Canopy area | 10' x 10' |
| Maximum height | 11' 2" |
| Headroom | 7' 1" |
| Valance clearance | 6' 11" |
|
The shelter is a 10' x 10' pop-up canopy that will keep volunteers protected from the elements while conducting operations. They are easily and quickly deployed. Pictures illustrate the most common canopy model used (Mark II caches have a more compact version stored inside). To review the text in a step, move your pointer over the corresponding picture. |
|

-
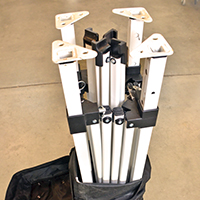 Step 1: Unzip the case and pull it down. Pull the frame out by the legs. The canopy may still be affixed.
 -
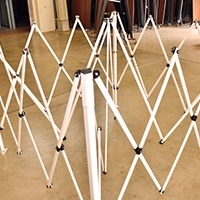 Step 2: Expand the frame outward about half way.
 -
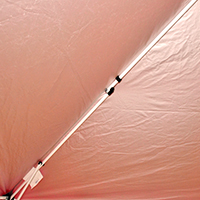
 Step 3: Drape the canopy over the frame. At each corner, secure the canopy using the hook-and-loop tabs.
 -
 Step 4: Now with the canopy affixed, pull out the frame the rest of the way.
 -
 Step 5: The shelter is now ready for BEECN operations. Push upward on the canopy so that the legs extend out, clicking and locking into place.
 -
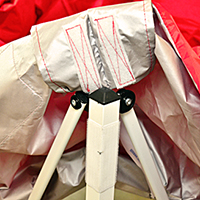
 Step 6: If you can safely reach them, close the hook-and-loop loops along the top of the frame to help keep the canopy secure.


Pop-Up Shelter Accessories
Each canopy should include a number of accessories located in the cache:
- Four white sidewalls, which are helpful for keeping the wind and rain out of the shelter.
- Stakes (usually located in a small pocket on the side of the shelter bag), for securing the shelter down if deployed on soil.
- Sandbags to help the canopy resist wind. A significant wind gust will turn the canopy into a sail and volunteers should use the weight bags even if they do not expect any wind. Sandbags are not as effective as water weights, but sandbags are easier to store and more versatile in what you can put in them to add weight (i.e. gravel or rocks if sand is not available).
-
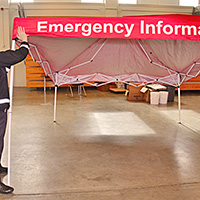
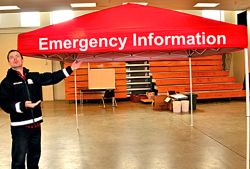 Figure 10: A completely deployed pop-up shelter.
 -
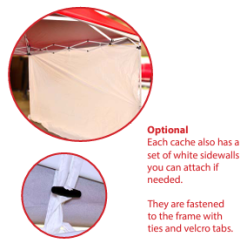 Figure 11: Detail of how to affix the shelter sidewalls.
 -
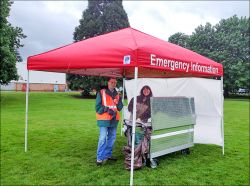 Figure 12: This canopy has one of the white sidewalls affixed.


.jpg)
Supportive BEECN Equipment
A fully stocked BEECN cache will include equipment to support BEECN volunteer objectives. Those items are:
| Item | Quantity | Intended Use | Order | |
|---|---|---|---|---|
 |
Hard hats | 2 | To protect BEECN volunteers from overhead hazards, and to make them more visible. | |
|
Vests | 2 | To make BEECN volunteers more visible. | |
|
Folding camp table | 1 | To provide BEECN volunteers with a writing surface as they log radio traffic. | |
 |
Binder | 1 | The binder contains all the logs and instructions that volunteers should need in order to operate the BEECN. | |
 |
3' x 3' Rollup whiteboard | 1 | For posting public messages at the BEECN site. Requires zip ties or other means of securing to the BEECN pop-up frame. | Portland Printing and Distribution; copy order #1151955 |
|
Rite in the Rain 5” x 7” ICS notebook | 1 |
| Item | Quantity | Intended Use | Order | |
|---|---|---|---|---|
|
Rite in the Rain 8” x 11” notebook | 1 | ||
| Visual translator | 1 | This is a pictogram-based communication aid for use in case someone needs help but does not speak English. | Kwikpoint Disaster Assistance Visual Language Translator | |
 |
Survival radio | 1 | A weather-rugged, crank-powered radio to tune into public information about the earthquake response. | |
 |
Lantern, LED
UCO Lumora LED Lantern |
1 | Illumination at the BEECN site. Functions as both a lantern and a flashlight. | |
 |
Bicycle pump | 1 | Included only in Mark I (rolling cart) BEECN caches. Used for re-inflating the cart tires as needed. | |
 |
Battery tester | 1 | Used to make sure all radio batteries in the cache have a full charge. | |
 |
Splinting cardboard, 12" | 6 | For splinting limbs. | Life-Assist item #SS120WF |
| Splinting cardboard, 18" | 6 | For splinting limbs. | Life-Assist item #SS180WF | |
| Splinting cardboard, 24" | 3 | For splinting limbs. | Life-Assist item #SS240WF | |
| Splinting cardboard, 36" | 3 | For splinting limbs. | Life-Assist item #SS360WF |
SKEDs and MegaMovers
| Relevant Documents | Updated |
|---|---|
| SKED Instructions and User Manual | 2024 |
Each BEECN cache initially included a single SKED Basic Rescue System for patient transport. However, SKEDs are being phased out and only a few BEECNs still have them. Instead of a SKED, caches are stocked with several MegaMovers. If a BEECN Coordinator manages a cache with a SKED and they prefer to have MegaMovers, they should contact PBEM and ask for an exchange. PBEM will not replace a missing or damaged SKED with a new SKED, though PBEM will make a best effort to replenish missing parts (e.g. straps).
The reason for the change is that SKEDs are very expensive, take up a lot of space in the cache, and require training to use. MegaMovers are inexpensive, intuitive, and six MegaMovers can take the place of one SKED. The only drawback is that MegaMovers are intended as single use and disposable, though it is acceptable to use them after their first use for heavy objects (MegaMovers have an approximate weight limit of 500 lbs.)
Using and training with a SKED
If a team has a SKED and they opt to keep it, they should learn how to use it. PBEM does not offer regular SKED training, though it is possible to provide on request and as resources allow. Skedco, the manufacturer of SKED rescue systems, has a user manual available for download at the top of this article. Skedco also has a YouTube channel with many training videos.
| SKED Specifications | |
|---|---|
| Size (in pack) | 9" diameter x 36" length |
| Size (laid out) | 3' x 8' |
| Weight (in pack) | 17 lbs. with all accessories |
| Max weight allowance | Unclear; 1,350 lbs documented |
| Temperature range | Down to -120 °F |
Every SKED kit should include the following:
 |
|
Use of MegaMovers
MegaMovers are intuitive enough not to require a handbook. But a few notes are in order:
- MegaMovers can be used for dragging patients when necessary. However, a MegaMover used for dragging should not be used again for patient transport.
- Most (not all) MegaMovers stocked in BEECNs have a cross strap to help secure the patient. Use of a cross strap is particularly important for dragging.
- Don't forget how many people it takes to transport a patient safely. Best practice is four minimum. A MegaMover will allow for up to ten people helping.
- A MegaMover is about 2 lbs. by itself, and folds down to 10" x 12" x 1". A deployed MegaMover is 32” x 72” and has a load limit of 500 lbs.

BEECN First Aid Kits
X
| Image | Small First Aid Kit Item | Quantity | Order |
|---|---|---|---|
 |
Waterless hand sanitizer (12 oz bottle) | 4 | |
 |
Cleaning agent/soap (12 oz bottle) | 2 | |
 |
Bandage shears | 2 | |
 |
Forceps
Dynarex disposable tweezer/forcep |
2 | Life-Assist item #IN4050 |
 |
N95 face mask (case of 20) | 1 | |
 |
Protective eyewear | 4 | |
 |
CPR mask with one-way valve (adult)
Laerdal pocket mask in yellow hard case |
4 | Life-Assist item #AB82V |
 |
CPR mask with one-way valve (child) | 2 | |
 |
Duct tape
Ernest Packaging 2" tape, 60 yard roll |
2 | Life-Assist item #TA6000 |
 |
Infectious waste disposal bags | 10 |
| Image | Large First Aid Kit Item | Quantity | Order |
|---|---|---|---|
 |
Disinfecting wipes
PDI Sani-Hands, 5" x 8" |
25 | Grainger item #9RAE2 |
 |
Triple antibiotic ointment | 25 | |
 |
Roll surgical tape (.5") | 4 | |
| Roll surgical tape (1") | 4 | ||
| Roll surgical tape (2") | 2 | ||
 |
Chemical cold packs | 10 | |
 |
Chemical hot packs
Dynarex heat pack 9" |
12 | Grainger item #36PV29 |
 |
4" x 4" non-sterile gauze sponges (100 count package) | 1 | |
 |
4" non-sterile roller bandages
DUKAL conforming stretch gauze |
12 | Life-Assist item #BJ604 |
 |
Non-latex exam gloves (small), box | 2 | |
| Non-latex exam gloves (large), box | 2 | ||
 |
Sterile adhesive bandages 1" (box of 50) | 2 | |
| Sterile adhesive bandages 2" (box of 50) | 1 | ||
 |
Sterile bulk dressings 5x9” (box of 25) | 2 | |
| Sterile bulk dressings 8x10” (box of 20) | 1 | ||
 |
Triangular bandages | 24 | |
 |
4” emergency compression bandage | 4 | |
| Survival blankets | 100 | ||
 |
Elastic bandages 4" x 5 yard roll
DUKAL #504 elastic bandage |
5 | Life-Assist item #BE504 |
 |
Feminine pads, pack of 12 | 2 |