PBEM's portable burn pan is a fire extinguisher demonstration tool intended primarily for community engagement events. However, it can also serve as a NET training tool for low-intensity training when the usual burn pan at Portland Fire & Rescue Training is not available. NET volunteers trained on its setup and use can check out the burn pan.
We are unable to check out the burn pan during a declared burn ban. You can't burn as much as you can with a burn pan under a burn ban, man.
PBEM will check out the burn pan for use only on days when the heat index is BELOW 90°F. Not only is it unsafe for trainees to stand around in direct the sun for a prolonged period, but heat can cause the contents of a propane tank to expand and possibly cause a leak. If the borrower has a plan to mitigate these factors, PBEM can reconsider.
A minimum of two volunteers trained on the burn pan is required to check it out for a session. One volunteer needs to operate the control pad, while the other needs to ensure trainees are engaging in safe practices and keeping an eye out for prospective hazards. One volunteer will also be challenged to load in and load out safely because the burn pan case is too heavy for most people to lift.
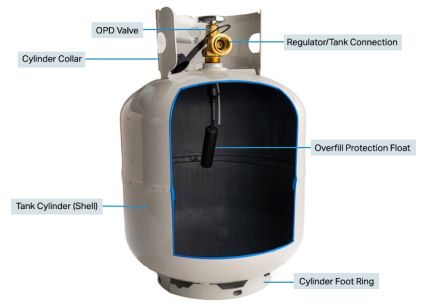
The insides of a propane tank.NEVER store or place a propane tank indoors or in an enclosed area such as a basement, garage, shed, or tent. It is illegal and highly unsafe to store propane tanks indoors.
When transporting a propane tank in a vehicle:
ALWAYS make sure your vehicle is vented (e.g. open a window).
Do not place a propane tank in a hot, confined space (such as a trunk on a hot day).
Make sure the propane tank is secure, preferably by placing it down and behind a seat. Think about where a 40 lb. propane tank is going to go if your vehicle were in a collision.
NEVER try to modify or repair valves, regulators, or other tank parts.
Operate the prop with a propane tank only when the tank is upright to ensure that only propane vapors are drawn from the tank.
Video: It's important that people understand why you never use water on a grease fire.
The instructor MUST be familiar with, and able to instruct without deviating from, the CERT guidelines for CERT fire extinguisher use (click HERE to review). Optimally, trainees will also be familiar with this material.
Here are helpful videos to illustrate home fire dangers:
Room Flashover: Demonstrates how quick fire can destroy a single room.
Using the burn pan at a Portland Parks site
You can do a burn pan exercise at a Portland Park provided that the following rules are strictly observed:
PBEM has as much notification as possible in order to inform Portland Parks & Recreation and the Park Rangers;
There is no burn ban or red flag warning in effect for Portland;
Training purposes only (no roasting marshmallows, not that you can do that with this prop anyway);
Have both a conventional fire extinguisher AND a shovel nearby and ready;
Cordon off a safety perimeter to prevent curious members of the public from getting anywhere near the prop. 'Caution' tape is recommended;
The pan is placed on a non-combustible, durable surface and no marks are left behind (basic Leave No Trace principles).
A Park Ranger may visit the training to observe.
Burn Pan Set-up and Use
Burn pan ingredients
You will need:
1.) The burn pan base unit, which comes in a large plastic roll case. It requires two people to lift it safely as it weighs about 70 lbs. and is large. The case should contain:
a.) The keypad;
b.) Black keypad cord that connects to the base unit;
c.) Yellow power cable that runs from the base unit to the cigarette lighter/12v power outlet on a vehicle;
d.) Propane hose that runs from the base unit to a propane tank;
e.) Small plastic pitcher and funnel for refilling the water extinguishers;
f.) Plastic sensor guard that fits over the face of the base unit.
2.) WATER fire extinguishers. Decide how many you will need based on how many trainees you expect. A single extinguisher is good for five or six passes. PBEM owns six water extinguishers (which will allow around 30 participants when they are appropriately filled and fully charged). Additional water extinguishers can be used if necessary.
3.) Tire inflator or portable air compressor, to charge the fire extinguishers to 100 PSI. PBEM has a tire inflator with the kit, but it's slow. A volunteer who has access to a portable pancake air compressor is encouraged to bring it.
4.) Metal prop plate that goes over the base unit.
5.) Trash can prop, which fits over the metal prop plate.
6.) Small propane tank (the ones rented from 7-11 for grills work great).
7.) Two to two and a half gallons of water to fill the base unit.
8.) A dry-chem extinguisher to have on hand for safety, not for demonstration use.
9.) A vehicle or two to haul all this, and to provide power to the base unit. Everything can fit in one SUV or maybe a hatchback, or two standard sized sedans.
10.) A safe location. The prop should NEVER be used inside a building, garage, or enclosed area. Keep it 20 ft. away from vehicles, and do not use it near combustible materials. Set it up on a hard surface such as concrete, rock or stone (do not use on a wooden deck).
11.) Sufficient prep and break down time. You'll want 15 minutes for each extinguisher you need to prep, and 15 minutes to prep the base unit system. When the exercise is over, you'll need to wait ten minutes or so for the equipment to cool down and another five or ten to break it down.
Transporting the props
Never leave this equipment unattended when not secure: not when transporting it, storing it, or using it. When transporting and storing it, all props must be kept in a secure location. Do not leave the props locked in an unattended car open to view (storing in the trunk is OK). The large case and shiny metal is an ideal target for thieves of even mediocre ability who can smash your window and pull it out of your vehicle in less than the time it took you to read this section.
System set-up
Place the base unit in an open area away from all combustible materials. Ensure the front of the system is down wind (i.e. the wind is at the trainee's back).
Place the propane tank 10 ft. behind the base unit.
Place the gas hose in a safe position (to prevent a tripping hazard).
Ensure the valve on the propane tank is completely closed.
Connect the quick disconnect end of the propane hose to the quick disconnect coupling on the rear of the base unit.
Thread and tighten the propane fitting (regulator side) into the propane tank.
Plug the male end of the black controller cable into the base unit.
Plug the female end of the black controller cable into the handheld controller.
Attach the yellow power cable to the rear of the base unit.
Fill the burn pan with water to the side overflow cut-outs (roughly two gallons).
Level the base unit using the adjustable feet.
Remove the sensor guard.
Confirm that a CO2 or dry chem extinguisher is nearby and ready.
Do a quick visual inspection for damage over the whole system.
System use
Safety Note
Never attempt to manually light the pilot.
Open the valve on the propane tank.
Plug the male end of the yellow power cable into the 12V DC power receptacle.
Enter the start sequence: FULL - IGNITION - A - IGNITION
Set difficulty level and class of fire to desired conditions.
Push and hold the HOLD TO RUN button. The main burners will ignite.
Trainees should be instructed to start fighting the fire when the timer on the LCD screen starts counting.
The trainee should then Pull the extinguisher pin, Aim at the base of the fire (NOT the sensors),[1] Squeeze the handle, and Sweep the extinguisher (P.A.S.S.) If the trainee properly aims and sweeps the extinguisher the flames will eventually go out and the time it took to extinguish the flame will be displayed.
Best practice is to keep intensity set to "Low".
Setting the difficulty
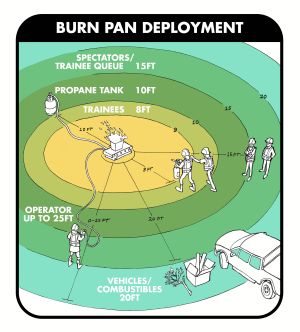
Diagram: the appropriate distances when instructing with the portable burn pan. Click to enlarge.Release all buttons on the handheld controller.
Press and hold down the round FLARE UP button.
After 3 seconds, the difficulty set menu will be displayed on the LCD screen.
While continuing to hold down the round FLARE UP button, use the selector knob to change the difficulty level. There are four difficulty levels: 1, 2, 3, and 4, with 4 being the most difficult. On the selector knob, A corresponds to level 1, B corresponds to level 2, etc.
Release the round FLARE UP button to lock in the difficulty level. The difficulty level is displayed on the LCD screen.
Setting the class of fire
The Intelligent Training System can simulate the way class A, B and C fires respond to a live fire extinguisher. For example, Class A fires respond by gradually extinguishing with the proper application of a dry-chemical extinguisher, while Class B fires are easily “knocked down” by a single sweep, but are quick to “flare up” if enough extinguishant is not discharged. I.T.S. has the ability to simulate these differing responses.
The class of fire can be set by moving the selector knob to either A, B, C, or Full.
The class of fire chosen will be displayed next to the difficulty setting.
SmartExtinguisher information
Only water extinguishers are appropriate for use with the portable burn pan. The best extinguishers to use are the SmartExtinguishers that came with the burn pan system. To use these extinguishers:
Where possible, prepare the extinguishers the day before your exercise (it can take about 15 minutes to fully prep one).
Unscrew the collar at the top of the extinguisher.
Do not fill extinguishers to the top. Fill each one with six liters of water, replace the top, and hand tighten the collar.
Connect an air compressor or tire inflator to the regulator on the extinguisher and pressurize to 100 PSI (6.9 bar) with compressed air.
Stand about eight feet from the burn pan when discharging the extinguisher.
Filled and fully charged, these extinguishers can feel heavy. It is recommended that instructors choose trainees for the first discharges who are comfortable with the heavier weight.
Shut down operation
Do not attempt to pack up the unit until it has completely cooled.
Only water extinguishers should EVER be used with the I.T.S.; dry-chem extinguishers will ruin the equipment.
Burn Pan Program History
PBEM had access to a portable burn pan through one purchased with UASI funds and owned by regional partners. However, access was inconvenient and inconsistent. Recognizing the burn pan's value as an outreach tool, Jeremy at PBEM dedicated funds to purchase one for the bureau.
The portable burn pan was purchased in October 2019 with PBEM bureau general funds (i.e., it was not grant funded). The vendor was Tom Smith Fire Equipment Company, Inc. COVID-19 struck shortly after purchase and it was mothballed and placed in storage until its first use, during a Rosewood Initiative training event, on October 8 2022.
Notes and References
↑The four sensors on the I.T.S. base unit detect the discharge of compressed air and water vapor from the SmartExtinguisher. The onboard microprocessor based control system then varies the flow of propane to each burner via electronic gas valves to increase or decrease the size of the flames.
To successfully extinguish the fire, the trainee must sweep the extinguisher across the base of the fire. If the trainee aims just below, or just above the base, the flames will go down, but will not extinguish. If the trainee only aims at one side of the fire, that side will be extinguished while the other side continues to grow.