BEECN Caches: Difference between revisions
| Line 134: | Line 134: | ||
#'''LED indicator:''' See article on LED indicators. | #'''LED indicator:''' See article on LED indicators. | ||
#'''Speaker-microphone jack:''' Connect the optional speaker-microphone or VOX adapter cable. | #'''Speaker-microphone jack:''' Connect the optional speaker-microphone or VOX adapter cable. | ||
#'''Lower key''' | #'''Lower key:''' Not for BEECN use. | ||
#'''Upper key:''' Not for BEECN use. | |||
#'''PTT switch:''' Push and hold to transmit; release to receive. | |||
#'''Antenna connector:''' Connect the antenna. '''''Never''''' operate the radio without the antenna attached. | |||
|} | |} | ||
===== Preparing the radio ===== | ===== Preparing the radio ===== | ||
The radio should either be in a carboard box marked "Icom" or a blue Pelican case (if the radio is still in a cardboard box, please let PBEM know so they can replace it with a Pelican case). When you open the box, you will find the radio disassembled in three pieces: radio, battery pack, and antenna. You will also find AA batteries in the box with the radio. Load batteries into the battery pack and affix the pack to the back of the radio. Screw the antenna on. Power the radio on to test the batteries. | The radio should either be in a carboard box marked "Icom" or a blue Pelican case (if the radio is still in a cardboard box, please let PBEM know so they can replace it with a Pelican case). When you open the box, you will find the radio disassembled in three pieces: radio, battery pack, and antenna. You will also find AA batteries in the box with the radio. Load batteries into the battery pack and affix the pack to the back of the radio. Screw the antenna on. Power the radio on to test the batteries. | ||
Revision as of 14:12, 17 December 2024
This section covers the BEECN equipment cache specifications and information about the equipment found in the cache.
Equipment Caches - General
PBEM is ultimately responsible for, and has complete discretion over, the design, purchase, placement, content, and security of BEECN caches.
Equipment Caches - Placement
- The location of a BEECN cache is NOT public information. It is information that should be known only to, and kept confidential by: PBEM, a hosting property owner, and volunteers responsible for the cache. All persons who know the location of a cache or have possession of a BEECN profile should treat the information as confidential.
- Optimally, a BEECN cache is secured in an indoor location that volunteers have access to in the event of a deployment. An indoor location’s structure should be reasonably expected to endure a major earthquake sufficiently that volunteers can recover the cache safely.
- The property on which a BEECN cache is stowed may be a school, a business, a place of worship, or a private residence. In any situation for deployments and exercises, volunteers should act as guests and take care not to damage the premises or (during drills and exercises) interrupt other activities on the site. Volunteers will defer to the authority of a property owner, or the owner’s representative.
- The agreement between a property owner who hosts a cache and PBEM is written into a Memorandum of Understanding (MOU).
Supplementary Equipment in BEECN Caches
- If there is space available, members of a BEECN cohort or nearby NET may place their own equipment in the cache to supplement the PBEM provided equipment.
- PBEM is not responsible for the loss, theft, recovery, or replacement of supplementary equipment placed in a BEECN cache.
- Supplementary equipment must not include food, prescription medications, or drugs.
BEECN Cache Inventory
A complete BEECN cache consists of the items found in the following list. BEECN volunteers can log an inventory of their cache through the BEECN Journaling System.
|
|
BEECN Cache Boxes
There are two types of BEECN cache boxes that volunteers may encounter in the field.
BEECN Mark I
| Mark I Cache Box Specifications | |
|---|---|
| Length (including handles) | 81" |
| Length (box alone) | 61" |
| Width | 25" |
| Height | 34" |
| Weight (fully loaded) | ≈ 250 lbs |
| Volume | ≈ 30 ft³ |
The most common is the "BEECN Mark I" diamond-plated aluminum toolbox (the kind you may see mounted to a pickup truck). It is bolted to a steel cart with wheels. All wheels are affixed with a castor to enable better maneuverability. These boxes were manufactured by Madden Fabrication and are being slowly phased out, replaced with Mark II caches as PBEM resources permit.
- Click an image to enlarge
-
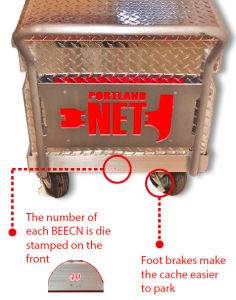 Figure 2: Appearance of a Mark I cache from the front.
 -
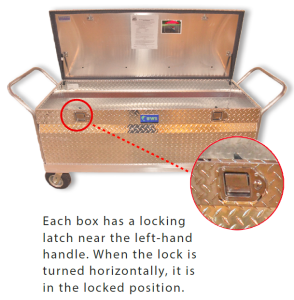 Figure 3: BEECN cache locking mechanism.


Most frequently, a BEECN Mark I is secured by means of a key safe and heavy gauge steel chain.
- Click an image to enlarge
-
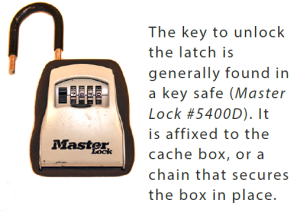 Figure 4: Key safe most often used to secure a BEECN.
 -
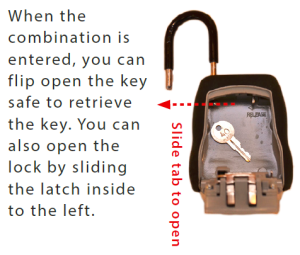 Figure 5: Key safe mechanics.


Troubleshooting the Mark I cache lid
Because the Mark I boxes have endured years in the elements and rough use, it is not uncommon for them to have problems with the lid latching mechanism (i.e. the lid won't lock shut). BEECN volunteers are encouraged to troubleshoot the problem themselves, but to contact PBEM if they cannot fix the problem. A volunteer may need pliers, a six inch (or larger) adjustable crescent wrench, and a mallet or hammer.
Most of the time the remedy involves adjusting one or both of the bolts on the lid. Each bolt is held on by two hexagonal nuts. A six inch (or larger) adjustable wrench works well to loosen these nuts and move the bolt to the left or right, whichever is needed in order for the bolt to snap into place when it connects with the locking mechanism on the main portion of the box. Some trial and error may be needed to get it right.
Graphite, Lock-Ease or similar products made for lock mechanisms are the only products that should be used on the lock. Do not use WD-40 or other general purpose "lubricants". Many of these contain solvents that, over time, will make the lock more difficult to operate.
You know you've got it working when you snap the lid shut and then turn the box key from the vertical to the horizontal position (don't force it) and the two latch handles do not move when you try to open the lid.
Mark I cache tires and moving the cache
The Mark I was designed to be mobile, with the idea that volunteers would wheel it from its storage location to the BEECN site. In practice, this is can be challenging. The inflatable tires can traverse uneven ground to a point, but do not do well in mud. Because of this, and since a fully loaded cache is over 250 lbs., it takes two people to move one of these caches provided the tires are fully inflated. Otherwise, in an actual deployment, volunteers may need to open the cache and carry supplies to the BEECN site.
For underinflated tires, each Mark I cache should include a bike tire inflation pump. If inflating the tire that way does not work, there is a good chance the tube needs replacing or patching. PBEM staff can replace the tube, or provide the needed tools to a BEECN volunteer to do it themselves.
Tools and materials needed:
- 2x 6" or 8" adjustable wrenches;
- Car jack and jack arm (this is helpful since otherwise you would need to empty the cache and flip it over);
- A bike tire patch kit and/or a replacement tube;
- Exam gloves (this is a messy job).
Use the two wrench to take the wheel off entirely and pull out the tube. Run your fingers inside the tire after the tube is out to make sure there's nothing poking through to puncture the tube you put in. If you buy patching material at a bike shop the easiest to use are the self-adhering patches that come with a bit of sand paper to scrape the area around the hole.
If the tube is replaced, do not throw away the old tube. PBEM will pick it up from you and use it to order a new one from Les Schwab.
BEECN Mark II
The Mark II is the newest model of BEECN cache, and PBEM deploys them as resources permit. The locations and appearance of these caches are shared only with volunteers assigned to them. The Mark IIs are also manufactured by Madden Fabrication.
UHF Handheld BEECN Radio
Each cache includes an Icom F4001 series UHF transceiver. The operations section of these Guidelines will cover which BEECNs use which channels. This section will cover basic operation of the radio. The best guide to using the radio is the instructional video on the right side of this page.
| UHF Handheld BEECN Radio Specifications |
|---|
| Powered on six AA batteries |
| Operates on 400 - 470 MHz UHF frequencies |
| Four watts transmit power |
|
picture |
|
Preparing the radio
The radio should either be in a carboard box marked "Icom" or a blue Pelican case (if the radio is still in a cardboard box, please let PBEM know so they can replace it with a Pelican case). When you open the box, you will find the radio disassembled in three pieces: radio, battery pack, and antenna. You will also find AA batteries in the box with the radio. Load batteries into the battery pack and affix the pack to the back of the radio. Screw the antenna on. Power the radio on to test the batteries.